Wednesday, 29 May 2013

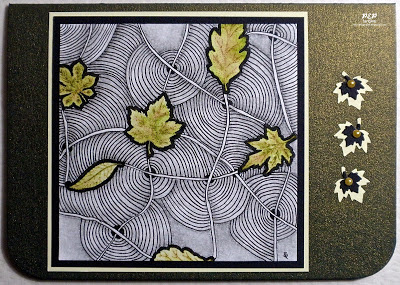
Bridgen Leaves

After working on my earlier leaf assignment I've become increasingly conscious of an innate delight in the shapes & colours of leaves &, knowing that I possess a number of 'leafy' Chocolate Baroque stamps, I thought I'd try combining them with tangles. I sat trying to decide where to place the stamps & wasn't getting anywhere so just threw them one by one onto the tile & stamped each image where it landed.

front of card

close-up of leaf
embellishments

inside of card

The Nick Bantock Van Dyke Brown I used for stamping splits into greens & browns when water is added so I merely used a damp paintbrush to spread the colour within each leaf. I then hit on the idea of using the leaves as the 'circles' in Bridgen & went from there.


Recipe
Stamps Chocolate Baroque UDLSP0234 Autumn Hedgerow & UDLSP0235 Nature Table
Inks Nick Bantock Van Dyke Brown (leaves on front) & Memories Black Dye (leaves inside).
Pens/Markers 01 Sakura Pigma Micron (tangles); Graphite pencil (shading).
Cardstock Winsor & Newton Cotman 190gsm Cold Pressed/NOT Grain Fin Watercolour Paper; black, yellow & gold cardstock from stash.
Punches Woodware (small & large leaves); EK Success (corner rounder).
The pearls are Kanban.

Challenges Entered
Simon Says Stamp & Show: Into the Woods - stamped & punched leaf shapes; the circular effect of the tangle pattern reminds me of the growth rings used in tree-ring dating (dendrochronology)
Simon Says...Anything Goes!

Thursday, 23 May 2013

MCC Time to Tangle with Colours - Final Project

Links: MCC (My Creative Classroom), Marie Browning

The last assignment was also the pencil project for the fourth week. It ended up being quite a challenge to add the colour as the Coloursoft pencils proved rather difficult to layer in the Black Page Album Moleskine I'd chosen to work in. As I'd already completed all the tangles when I discovered the lack of 'tooth' for layering I persevered  but mostly stuck to using one single colour in each small section of pattern.

Impressed Technique on Black
tangles: Barberpole, Bridgen, Chevron, Dot Grid, Plumes, Sooflowers, Zoya
tangled using a ball tool in Black Page Album Moleskine
Coloured with Derwent Coloursoft Pencils

Tuesday, 21 May 2013

MCC Time to Tangle with Colours - Wk 4


In the final week of the course Marie showed two different ways of creating white tangles coloured with Tombow Markers. The first uses the Tombow Glue Pen as a resist & the second a white gel pen  on vellum. Of the 3 white pens (Pergamano, Pentel Hybrid Gel Grip K118 & Sakura Gelly Roll) that I tried, I found the Gelly Roll gave the best results when tangling.

Watercolour Blending with Resist
tangles: Trentwith with a mixture of Shattuck & Tagh
Tombow Markers watercolour wash & outline blending over Glue Pen resist
plus indirect Blender Pen colouring on Canson XL Series Mix Media 98lb/160g paper 

Vellum Tangle
tangles: Crescent Moon, Florz, Knightsbridge, Mooka
Tombow Markers direct to vellum colouring,  mounted with
 brads onto textured silver cardstock matted on deep pink cardstock

I struggled rather with the Draw & Blend technique - this is the best one.

Draw & Blend
tangle: Knightsbridge
Tombow Markers direct to paper & watercolour blending on
Daler-Rowney Langton 300gsm Hot Pressed Extra Smooth watercolour paper
mounted onto dark green cardstock

Thursday, 16 May 2013

Crosshatched Background & Chocolate Baroque Hand Challenge

Links: Chocolate Baroque Hand Challenge, Glenda Waterworth, MCC (My Creative Classroom), Marie Browning

When I saw Miranda's Henna Hand on the Chocolate Baroque  Design Team Blog I thought of tangling a hand as I'd seen several examples in Suzanne McNeill's Zentangle 4 but, since I was just starting the MCC tangling course, I filed the idea at the back of my mind.  Inspired by Miranda's artwork, Glenda has now posted an open Hand Artwork Challenge on the Chocolate Baroque Forum (free to join) which I thought I could combine with the third week's pencil crosshatched background technique. With hindsight I'm not so sure that was a good idea.

tangles: Hurry, Sand Swirl
Derwent Coloursoft Pencils crosshatched background on
Canson XL Series Mix Media 98lb/160g paper 

I'm rather ambivalent about this piece of artwork as the finished piece reminds me too much of a mummified hand & the patterning is much too life-like in terms of fingerprints for comfort. The latter is quite symbolic actually for I drew round my own hand & both the little fingers are crooked - an inherited characteristic from my mother's paternal lineage.

Tuesday, 14 May 2013

MCC Time to Tangle with Colours - Wk 3

Links: MCC (My Creative Classroom), Marie Browning

tangles: Cadent, Chevron, Cubine, Hypnotic, Jonqual,
Knightsbridge, Neuron, Nzepple, Peaks Border, Screen, Tagh, Tipple  

There was a choice of assignments for the third week's Dual Brush Pen homework so that those who had already taken one of Marie's earlier tangling classes, which I have, could choose to tackle something fresh. So, instead of drawing & colouring another "Flower Garden" (see here), I set to work with the "Falling Leaves" project.  This incorporated watercolour blending, indirect Blender Pen & direct to paper colouring, Glue Pen Resist & haloing techniques as well as layering of complimentary colours to produce muted tones. The latter was a most interesting exercise as all of my leaves started out watercoloured in various greens & ended up as in the photographs once I'd applied the additional reds, pinks, oranges & yellows. The whole piece is about 6½ x 9¾ inches in size using Daler-Rowney Langton 300gsm Hot Pressed Extra Smooth watercolour paper.

close-up of top section

close-up of central section

close-up of bottom section

As I didn't have any suitable dies or die-cuts to draw round I drew myself some leaves freehand. Another option would have been to use real leaves but the leaves in our woodland are soaking wet because of the heavy rainfall we are experiencing at present.

close-up showing  the pinky white spots where the Glue Pen Resist repelled the colouring

Tuesday, 7 May 2013

MCC Time to Tangle with Colours - More Wk 2

Links: MCC (My Creative Classroom), Marie Browning

In the second week Marie included a very detailed tutorial on how to colour the tangle Purk using a combination of the Irojiten pencils with Tombow Markers & the Blender Pen. I set out to replicate her illustration using my Derwent Coloursoft pencils with the Tombows & Blender Pen on the Canson Mix Media paper (recommended by Marie as having the ideal amount of texture/tooth for layering the colours).


As I worked I realized that I wasn't getting the debris that I had previously when using the Coloursofts & experienced quite a thrill as I saw the tangle coming to life. I was just going to add the Tombows & Blender Pen as Marie had when my husband suggested that I leave it without blending & draw another. That was when I decided to test out a number of different methods of blending (see photo below & click to enlarge for details).


The 'homework' pencil project was to draw an organic Zendala & include the 'scrumbling stroke' when colouring it. I used scrumbling to fill in the lime/yellow areas & blended the other areas using a paper stump dipped in Sansodor. I was actually rather surprised that the Sansodor didn't cause the Pigma Micron I used for the tangles to smear whatsoever, having said that I always heat set prior to colouring when using the Pigma Microns.

tangles: Flux, Meer, Pokeroot, Sanibelle
Derwent Coloursoft Pencils blended with Sansodor & paper stumps
 on Canson XL Series  Mix Media 98lb/160g paper
White Pentel K118 Hybrid Gel Grip Pen used for highlighting

Thursday, 2 May 2013

MCC Time to Tangle with Colours - Wk 2

Links: MCC (My Creative Classroom), Marie Browning

The Dual Brush Pen assignment for the second week was to create a tangled landscape whilst focussing upon the indirect blending technique with the Blender Pen. I also wanted to try using the optional 'haloing' technique that Marie demonstrated. With hindsight I might have been better only adding a few haloed swirls in my lower portion of sky. When I haloed the inside of the outermost border in grey there was very little difference between the halo & the black so I tried moving it a little with the Blender Pen & ended up quite pleased with the result. Some more lessons learnt through what I would once have considered mistakes. I also used stippling to create the foliage for the fractal tree.

Landscape ZIA
tangles: Chillon, Fractal Tree, Jonqual, Knightsbridge, Meer, Mooka, Nipa, Printemps, Purk, Scallops
Tombow Markers colouring on Canson XL Series Mx Media 98lb/160g paper

Wednesday, 1 May 2013

A Square Challenge for Chocolate Baroque

May's Challenge (Number 14) for the Chocolate Baroque Zentangle Group is to create a tile or ZIA based upon a square string of our choice.

I couldn't resist working on a ZIA using the techniques I've been learning during the MCC Time to Tangle with Colours course. I decided to use warm colours this time & to work on watercolour paper (Daler-Rowney Langton 300gsm Hot Pressed Extra Smooth) as opposed to the Canson XL Series Mix Media 98lb/160g paper. The Tombow inks move well (but differently) with water on  either paper though they do seem extra 'bright' somehow on the watercolour paper. I also discovered that using a conventional Sable brush as opposed to a synthetic water reservoir brush helps to eliminate any hard lines & moves the colour about more effectively.

Again I have used my Black Page Album Moleskine for mounting the squares.

tangles: Hollibaugh, Knightsbridge, Nekton, Nzepple, Quandary, Tripoli, W2
Tombow Markers outline watercolour blending, indirect Blender Pen & direct to paper colouring