Tuesday 24 December 2013

Christmas in Black & White

I wanted to incorporate my Winter Foliage ZIA into a Christmas card & that is how the layout came about. The other two cards have an identical layout - in fact very similar to that in my previous post though these were made earlier as they needed to be sent via Royal Mail.


tangles: Flux, Verdigogh

tangles: Cruffle, Verdigogh

tangles: Cruffle, Flux

inside of cards

Supplies
Pens/Markers 01 Uni Pin Drawing Pen & 08 Sakura Pigma Micron Pen (tangles); 07 Pergamano White Gel Pen (highlights on Flux); Memento Tuxedo Black Dual Marker (edging Zentangle tiles & message panels).
Cardstock Official Zentangle tiles; white & black from stash.
Dies Spellbinders Sheapeabilities Create-A-Flake Three (snowflakes) & Nestabilities Labels Sixteen (message panels).
Punch Woodware Corner Rounder (black matting panels for Zentangle tiles).

Friday 20 December 2013

Zentangle Inspired Christmas Cards

These are my two submissions for The Diva's Weekly Challenge #148: "Merry Happy" where her brief is:

"In the spirit of the Holidays, this week's challenge is to create a piece or tile for your own holidays. Whatever you celebrate, however you celebrate."

My two cards have basically the same layout but didn't start off that way. Both, however, were the result of persevering & finding a way round mishaps (or perhaps I should say opportunities since there are no mistakes in Zentangle).


tangles: Huggins, Hurry

The first was going to be a large ZIA (Zentangle Inspired Artwork) simply matted on gold cardstock before mounting onto a card base. I'd tangled all of it including a wide frame of Meer & had shaded the Huggins (using Derwent Coloursoft pencils with a paper stump & Sansador) when I stopped to sort out the sponges in the little pot I use for keeping a small amount of the Sansodor for dipping my paper stumps into. In so doing a drop of Sansodor landed on my artwork but thankfully only on the frame portion. Chopping off the frame meant that I had a square slightly smaller than a Zentangle tile which I mounted onto a 4 inch square of black cardstock with rounded corners. The snowflakes are die-cuts (using Spellbinders Shapeabilities Create-A-Flake Three). The stars were drawn using a Pinflair Stepper Template.


tangles: Cruffle, Flux

The second card uses an Official Zentangle Tile edged in black ink (Memento Tuxedo Black Dual Marker) mounted onto a 4 inch square of black cardstock with rounded corners & another 4 snowflakes as in the first, red cardstock instead of gold & a black card base. My mishap here occurred as I was going to shade the leaves using a single green Derwent Coloursoft pencil with the paper stump & Sansador. Despite heat setting my Sakura Pigma Micron penwork it smudged badly whereas in my first card it had not. The only difference between the two was my substrate: in the first W H Smith 220gsm white cardstock & in this one the official tile. I salvaged the tile by layering 3 shades of green pencil to achieve the shading of the leaves. I was rather pleased with the result for the baubles really gained definition against the brightness of the leaves. A white gel pen was used to add highlights on the berries.


inside of cards

Both cards have the same internal design - a simple white die-cut (Spellbinders Nestabilities Labels Sixteen) edged with the Memento Tuxedo Black Dual Marker forms the message panel.

Sunday 1 December 2013

Winter Foliage

The December Challenge (Number 21) for the Chocolate Baroque Zentangle Group is based upon the theme of Winter. Fir trees are what immediately spring to my mind when I think of winter &, of course, snow. Our front garden is hedged with Cotoneaster bushes providing an abundant feast of berries for the birds at this time of year so my Zentangle Inspired Artwork (ZIA) developed along the lines of winter foliage rather than snowflakes.

tangles: Flux, Verdigogh

The official Zentangle tile was edged with a black marker (Mememto) prior to mounting onto a larger square of black cardstock with rounded corners. A white gel pen was used to add highlights to the berries.

Friday 25 October 2013

Zenspirations Heart & Thoughts About Shading

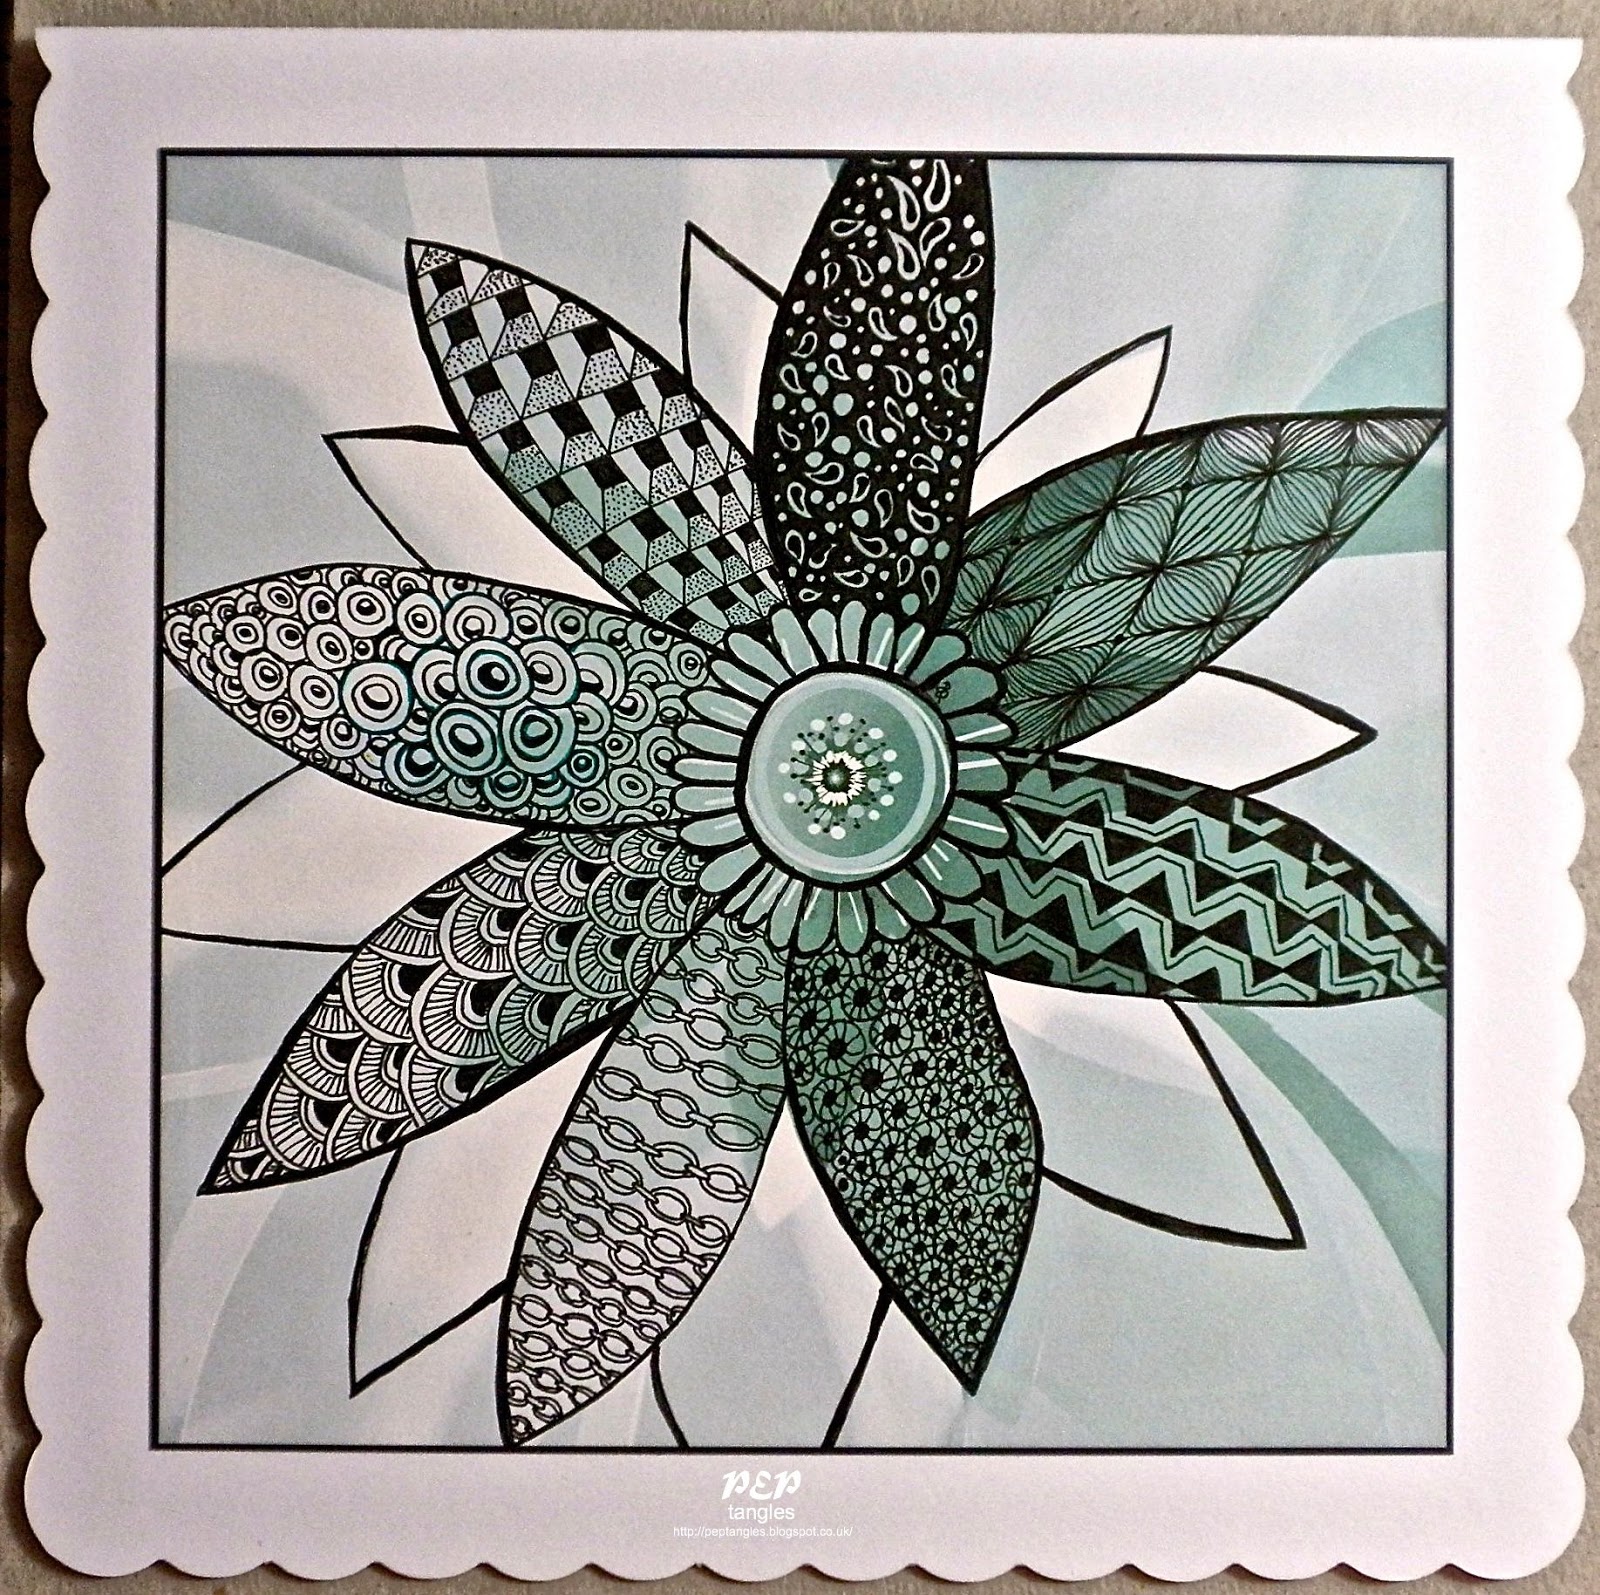
I actually drew this at the end of August for a friend's wedding anniversary card. It was in inspired by Joanne Fink's book Zenspirations Letters & Patterning as well as Penny Raile's chapter in The Art of Zentangle book. Seeing my frustration after spending a whole afternoon trying to shade it (using photocopies) my husband suggested that I don't shade my tangles or similar designs as he likes them with just the penwork - this is where Penny Raile's artwork comes in for I immediately showed him her work without shading in the book. My initial response was "NOT SHADE - that's for beginners, I can't not shade, but........ there's Joanne's colouring & Penny's tangles & ........... they're not beginners." So, I've been thinking quite a bit about the subject.

I find that I can draw my tangles but when it comes to shading them - though I know the theory of it & where to shade - I can feel myself becoming tense,  in fact it feels like a chore looming ahead. I can see that shading adds depth & dimension but I really dislike the gritty smudginess of graphite. I'd be interested to hear anyone else's thoughts on the matter.

front of card - the names of the recipients were written
along the two little 'balancing' paddles

inside of card showing message panel

Supplies
Stamps Chocolate Baroque UDLSP0310 Swirly Pets.
Inks VersaFine Onyx Black (hearts).
Pens/Markers 01 Uni Pin Drawing Pen, Memento Tuxedo Black Dual Marker (edging message panel).
Cardstock White & Black from stash.
Paper Winsor & Newton Cotman 190gsm Cold Pressed/NOT Grain Fin Watercolour Paper.
Die Spellbinders Nestabilities Labels Twenty-Two (message panel).
The pearls are Kanban.

Tuesday 1 October 2013

Organic Chocolate Baroque in a Zendala Dare

October's Challenge (Number 19) for the Chocolate Baroque Zentangle Group is to create a tile or ZIA based upon organic tangles. It was when I saw the centre of Erin's Zendala template #75 for this week that I realised it would give me a super starting point using the tangle Cyme.

tangles: Cyme, Flux, Meer

I used the smallest of Erin's templates, initially thinking I would create a conventional Zentangle tile, but I was struck by how floral the whole looked without the outside circular linework. One thing led to another & so it was fussy cut & mounted onto some pearlescent black cardstock die-cut with a circular Spellbinders Nestabilites die (Standard Circles Small).

Sunday 1 September 2013

Tangling Wings

The Chocolate Baroque Zentangle Group Challenge for September (Number 18) is based upon the theme of "Wings."

Since I have a particular delight in bees I wanted to use the bee images from Chocolate Baroque's Honey Bee stamp sheet as the basis for my Zentangle Inspired Artwork (ZIA) interpretation of the challenge. I know that Zentangle is intended as art of an abstract nature but I couldn't resist creating a little habitat for my bees from Kass Hall's Honeycomb tangle (also demonstrated by Ellen Wolters in video format).

tangle: Honeycomb

My edging is simply two wavy lines crossing one another with the segments filled in & the whole 3½ inch square tile is mounted onto a slightly larger piece of black cardstock.

close-up showing sparkly iridescence of bees' wings

Recipe
Stamps Chocolate Baroque UA5SP0375 Honey Bee.
Inks VersaFine Onyx Black (bees).
Pencils/Markers O1 Uni Pin Drawing Pen, 2B Lakeland Graphite Pencil.
Colouring Nicholson's Peerless Transparent Water Colors (bees' bodies), Crystal Ice Stickles Glitter Glue (bees' wings).
Cardstock W H Smith 220gsm White; Black from stash.
Punch Woodware (corner rounder).

Tuesday 30 July 2013

Triangular Stringing

August's Challenge (Number 17) for the Chocolate Baroque Zentangle Group consists of a triangular string of our choice - it can be one taken from the Strings Resource at TanglePatterns.com or one we've drawn.

I chose to sketch two differently sized overlapping triangles loosely in the manner of a traditional Star of David symbol (see superimposed coloured lines) & started off tangling the triangles thus formed using Paradox. I used Ixorus for the centre & surprisingly created another 6 triangles.

tangles: Ixorus, Paradox, Tipple

Monday 1 July 2013

Tangling Grids for Chocolate Baroque

July's Challenge (Number 16) for the Chocolate Baroque Zentangle Group is once again based upon tangles (the challenges are based upon a rotation of three: tangle/s; strings; theme/s). This time the brief is to use ONLY tangles based upon a grid.

Two tangles based upon grids & which can be beautifully 'merged' are Cadent & Cubine. I wanted to see what these would look like using curved grids so I created a string of two overlapping pointed ovals. The vertical oval is tangled with Cubine & the horizontal with Cadent; the segment where the two ovals overlap is tangled with a combination of Cadent & Cubine.

tangles: Cadent, Cubine

The restriction of using ONLY grid based tangles proved quite an interesting challenge for I found I was wanting to add an organic tangle like Fescu emanating from each of the points where my two tangled ovals meet. I resisted the urge & just added s tiny touch of sparkle to the Cadent circles using a Clear Sakura Stardust Gelly Roll pen.

close-up to show sparkle of Cadent's circles

Saturday 8 June 2013

Leafy Chocolate Baroque Zentangle Group Challenge

The Chocolate Baroque Zentangle Group's June Challenge (Number 15) is based upon a theme: a leaf or leaves should appear somewhere on the tile or ZIA.

I actually took a leaf from our garden & drew it freehand inside a square border before tangling & colouring.

tangles: Barberpole, Nzepple
Tombow Markers outline watercolour blending & indirect Blender Pen colouring on
 Daler-Rowney Langton 300gsm Hot Pressed Extra Smooth watercolour paper

Wednesday 29 May 2013

Bridgen Leaves

After working on my earlier leaf assignment I've become increasingly conscious of an innate delight in the shapes & colours of leaves &, knowing that I possess a number of 'leafy' Chocolate Baroque stamps, I thought I'd try combining them with tangles. I sat trying to decide where to place the stamps & wasn't getting anywhere so just threw them one by one onto the tile & stamped each image where it landed.

front of card

close-up of leaf
embellishments

inside of card

The Nick Bantock Van Dyke Brown I used for stamping splits into greens & browns when water is added so I merely used a damp paintbrush to spread the colour within each leaf. I then hit on the idea of using the leaves as the 'circles' in Bridgen & went from there.


Recipe
Stamps Chocolate Baroque UDLSP0234 Autumn Hedgerow & UDLSP0235 Nature Table
Inks Nick Bantock Van Dyke Brown (leaves on front) & Memories Black Dye (leaves inside).
Pens/Markers 01 Sakura Pigma Micron (tangles); Graphite pencil (shading).
Cardstock Winsor & Newton Cotman 190gsm Cold Pressed/NOT Grain Fin Watercolour Paper; black, yellow & gold cardstock from stash.
Punches Woodware (small & large leaves); EK Success (corner rounder).
The pearls are Kanban.

Challenges Entered
Simon Says Stamp & Show: Into the Woods - stamped & punched leaf shapes; the circular effect of the tangle pattern reminds me of the growth rings used in tree-ring dating (dendrochronology)
Simon Says...Anything Goes!

Thursday 23 May 2013

MCC Time to Tangle with Colours - Final Project

Links: MCC (My Creative Classroom), Marie Browning

The last assignment was also the pencil project for the fourth week. It ended up being quite a challenge to add the colour as the Coloursoft pencils proved rather difficult to layer in the Black Page Album Moleskine I'd chosen to work in. As I'd already completed all the tangles when I discovered the lack of 'tooth' for layering I persevered  but mostly stuck to using one single colour in each small section of pattern.

Impressed Technique on Black
tangles: Barberpole, Bridgen, Chevron, Dot Grid, Plumes, Sooflowers, Zoya
tangled using a ball tool in Black Page Album Moleskine
Coloured with Derwent Coloursoft Pencils

Tuesday 21 May 2013

MCC Time to Tangle with Colours - Wk 4


In the final week of the course Marie showed two different ways of creating white tangles coloured with Tombow Markers. The first uses the Tombow Glue Pen as a resist & the second a white gel pen  on vellum. Of the 3 white pens (Pergamano, Pentel Hybrid Gel Grip K118 & Sakura Gelly Roll) that I tried, I found the Gelly Roll gave the best results when tangling.

Watercolour Blending with Resist
tangles: Trentwith with a mixture of Shattuck & Tagh
Tombow Markers watercolour wash & outline blending over Glue Pen resist
plus indirect Blender Pen colouring on Canson XL Series Mix Media 98lb/160g paper 

Vellum Tangle
tangles: Crescent Moon, Florz, Knightsbridge, Mooka
Tombow Markers direct to vellum colouring,  mounted with
 brads onto textured silver cardstock matted on deep pink cardstock

I struggled rather with the Draw & Blend technique - this is the best one.

Draw & Blend
tangle: Knightsbridge
Tombow Markers direct to paper & watercolour blending on
Daler-Rowney Langton 300gsm Hot Pressed Extra Smooth watercolour paper
mounted onto dark green cardstock

Thursday 16 May 2013

Crosshatched Background & Chocolate Baroque Hand Challenge

Links: Chocolate Baroque Hand Challenge, Glenda Waterworth, MCC (My Creative Classroom), Marie Browning

When I saw Miranda's Henna Hand on the Chocolate Baroque  Design Team Blog I thought of tangling a hand as I'd seen several examples in Suzanne McNeill's Zentangle 4 but, since I was just starting the MCC tangling course, I filed the idea at the back of my mind.  Inspired by Miranda's artwork, Glenda has now posted an open Hand Artwork Challenge on the Chocolate Baroque Forum (free to join) which I thought I could combine with the third week's pencil crosshatched background technique. With hindsight I'm not so sure that was a good idea.

tangles: Hurry, Sand Swirl
Derwent Coloursoft Pencils crosshatched background on
Canson XL Series Mix Media 98lb/160g paper 

I'm rather ambivalent about this piece of artwork as the finished piece reminds me too much of a mummified hand & the patterning is much too life-like in terms of fingerprints for comfort. The latter is quite symbolic actually for I drew round my own hand & both the little fingers are crooked - an inherited characteristic from my mother's paternal lineage.

Tuesday 14 May 2013

MCC Time to Tangle with Colours - Wk 3

Links: MCC (My Creative Classroom), Marie Browning

tangles: Cadent, Chevron, Cubine, Hypnotic, Jonqual,
Knightsbridge, Neuron, Nzepple, Peaks Border, Screen, Tagh, Tipple  

There was a choice of assignments for the third week's Dual Brush Pen homework so that those who had already taken one of Marie's earlier tangling classes, which I have, could choose to tackle something fresh. So, instead of drawing & colouring another "Flower Garden" (see here), I set to work with the "Falling Leaves" project.  This incorporated watercolour blending, indirect Blender Pen & direct to paper colouring, Glue Pen Resist & haloing techniques as well as layering of complimentary colours to produce muted tones. The latter was a most interesting exercise as all of my leaves started out watercoloured in various greens & ended up as in the photographs once I'd applied the additional reds, pinks, oranges & yellows. The whole piece is about 6½ x 9¾ inches in size using Daler-Rowney Langton 300gsm Hot Pressed Extra Smooth watercolour paper.

close-up of top section

close-up of central section

close-up of bottom section

As I didn't have any suitable dies or die-cuts to draw round I drew myself some leaves freehand. Another option would have been to use real leaves but the leaves in our woodland are soaking wet because of the heavy rainfall we are experiencing at present.

close-up showing  the pinky white spots where the Glue Pen Resist repelled the colouring

Tuesday 7 May 2013

MCC Time to Tangle with Colours - More Wk 2

Links: MCC (My Creative Classroom), Marie Browning

In the second week Marie included a very detailed tutorial on how to colour the tangle Purk using a combination of the Irojiten pencils with Tombow Markers & the Blender Pen. I set out to replicate her illustration using my Derwent Coloursoft pencils with the Tombows & Blender Pen on the Canson Mix Media paper (recommended by Marie as having the ideal amount of texture/tooth for layering the colours).


As I worked I realized that I wasn't getting the debris that I had previously when using the Coloursofts & experienced quite a thrill as I saw the tangle coming to life. I was just going to add the Tombows & Blender Pen as Marie had when my husband suggested that I leave it without blending & draw another. That was when I decided to test out a number of different methods of blending (see photo below & click to enlarge for details).


The 'homework' pencil project was to draw an organic Zendala & include the 'scrumbling stroke' when colouring it. I used scrumbling to fill in the lime/yellow areas & blended the other areas using a paper stump dipped in Sansodor. I was actually rather surprised that the Sansodor didn't cause the Pigma Micron I used for the tangles to smear whatsoever, having said that I always heat set prior to colouring when using the Pigma Microns.

tangles: Flux, Meer, Pokeroot, Sanibelle
Derwent Coloursoft Pencils blended with Sansodor & paper stumps
 on Canson XL Series  Mix Media 98lb/160g paper
White Pentel K118 Hybrid Gel Grip Pen used for highlighting

Thursday 2 May 2013

MCC Time to Tangle with Colours - Wk 2

Links: MCC (My Creative Classroom), Marie Browning

The Dual Brush Pen assignment for the second week was to create a tangled landscape whilst focussing upon the indirect blending technique with the Blender Pen. I also wanted to try using the optional 'haloing' technique that Marie demonstrated. With hindsight I might have been better only adding a few haloed swirls in my lower portion of sky. When I haloed the inside of the outermost border in grey there was very little difference between the halo & the black so I tried moving it a little with the Blender Pen & ended up quite pleased with the result. Some more lessons learnt through what I would once have considered mistakes. I also used stippling to create the foliage for the fractal tree.

Landscape ZIA
tangles: Chillon, Fractal Tree, Jonqual, Knightsbridge, Meer, Mooka, Nipa, Printemps, Purk, Scallops
Tombow Markers colouring on Canson XL Series Mx Media 98lb/160g paper

Wednesday 1 May 2013

A Square Challenge for Chocolate Baroque

May's Challenge (Number 14) for the Chocolate Baroque Zentangle Group is to create a tile or ZIA based upon a square string of our choice.

I couldn't resist working on a ZIA using the techniques I've been learning during the MCC Time to Tangle with Colours course. I decided to use warm colours this time & to work on watercolour paper (Daler-Rowney Langton 300gsm Hot Pressed Extra Smooth) as opposed to the Canson XL Series Mix Media 98lb/160g paper. The Tombow inks move well (but differently) with water on  either paper though they do seem extra 'bright' somehow on the watercolour paper. I also discovered that using a conventional Sable brush as opposed to a synthetic water reservoir brush helps to eliminate any hard lines & moves the colour about more effectively.

Again I have used my Black Page Album Moleskine for mounting the squares.

tangles: Hollibaugh, Knightsbridge, Nekton, Nzepple, Quandary, Tripoli, W2
Tombow Markers outline watercolour blending, indirect Blender Pen & direct to paper colouring 

Friday 26 April 2013

MCC Time to Tangle with Colours - More Wk 1

Links: MCC (My Creative Classromm), Marie Browning,
           Glenda Waterworth (Seussisms post)

I struggled rather with the final assignment for the first week. My first mistake opportunity for learning came as I tangled, since, all the patterns I chose except the border are based upon grids. Next time I shall pay attention to the need for balance between grid-based & organic flowing tangles.

Secondly, as I worked with the Derwent Coloursoft pencils, I realised that I was getting an awful lot of debris & the layers began to 'stick' or 'catch' upon one another - particularly visible in Jester (top right). I switched to using my Polychromos pencils which, being oil-based, don't crumble & give off debris, but I still struggled to blend. I tried smoothing out the blending with the Tombow Blender Pen & found that it made no difference with either brand of pencil. Sitting & thinking about this I've concluded that I was much too heavy handed in my laying down of colour  &, possibly, the Tombow Blender isn't compatible with either Derwent Coloursoft or Faber-Castell Polychromos pencils.

Analogous Pencil Colouring
tangles: Cubine, Flukes, Jester, Pearlz, Screen
Derwent Coloursoft (Flukes & Jester) & Faber-Castell Polychromos (Cubine, Pearlz & Screen) both
blended with Tombow Blender Pen on Canson XL Series Mix Media 98lb/160g paper

Thursday 25 April 2013

MCC Time to Tangle with Colours - Wk 1

Links: MCC (My Creative Classsroom)Marie Browning

I was thrilled to discover that MCC were proposing to run a second tangling course taught by Marie Browning & so I signed up as soon as I could.

The class is taught using Tombow Dual Brush Pens & Irojiten Colour Pencils. I have a good selection of colours in the Tombow Pens but, since the Irojiten pencils are at present not easy to get hold of in the UK, I shall be using my tin of 36 Derwent Coloursoft pencils which are wax-based like the Irojiten.

The assignments for each week are optional, however, I always learn more when I actually engage with my materials & know from experience that a particular product can vary greatly in its performance depending upon what type of paper it is used upon. I shall include what I choose to do for 'homework' here in blog posts but for reasons of copyright I will not be giving detailed technical explanations.

The first assignment involved using the colours we find combined in the natural world to start a reference tool in the form of a notebook or Pinterest Board. I decide to work with the latter option using my own photographs to create a board which you can find HERE.

For my second assignment I chose to use oval shapes with a cool colour scheme to create a piece of Zentangle Inspired Artwork (ZIA) in my Black Page Album Moleskine.

Cool Colours ZIA
tangles: Cadent, Cubine, Hollibaugh, Nzepple, Printemps, Quandary, Triangles, Tripoli
Tombow Markers outline watercolour blending & indirect Blender Pen colouring on
Canson XL Series Mix Media 98lb/160g paper

Monday 1 April 2013

The Challenge of Borders

April's Challenge (Number 13) for the Chocolate Baroque Zentangle Group is a tangle based challenge focusing upon borders.


I drew my own string (above) & then watched the tile evolve totally dispelling my preconceived ideas about a sun with rays.

tangles: Barberpole (tangleation), Wire Wrap, Zig Zag Border

Saturday 23 March 2013

Spring Tangling

Firstly, thank you for all your thoughtful wishes - my migraine control has improved over the last month & after catching up with some essential organising about the house I shall hopefully have some more time for artwork.

I had some very old papers with a rather large floral looking design which I thought might work as a framework for tangling. I outlined some areas of the pattern until I had what looked like a very large flower & then tangled the petals using a selection of tangles from Suzanne McNeill's book Zentangle 3 plus Cubine from Zentangle Basics. The resulting artwork was then mounted onto black cardstock & a scalloped edge card blank. The inside is simply decorated using die-cut elements from Spellbinders Shapeabilities Lace Doily Motifs & Accents.

tangles: Bubbles, Chaingang, Cubine, Droplets, Loops,
Rain (tangleation), Scallops, Yincut

inside of card

Challenges Entered (card above)
Everybody-Art Challenge 228 - Spring (a floral theme plus the green of Spring flowers)
Simon Says Stamp Challenge - Easter/Spring (the Spring theme of flowers & the colour green)


As I had a second large card blank (but without scallops) I made another card using slightly different tangles but keeping the same design for the inside.

tangles: Barberpole (tangleations), Bubbles, Droplets, Loops,
Rain (tangleation), Scallops, Strircles, Yincut

Friday 1 March 2013

Tangling with Chocolate Baroque

The March Challenge (Number 12) for the Chocolate Baroque Zentangle Group is based upon a floral theme.

Chocolate Baroque recently released a sheet of rubber stamps, Tangled Garden, containing images for both tanglers & non-tanglers alike. I used the large open flower image for my tile which I then mounted onto a piece of black cardstock making it a ZIA (Zentangle Inspired Artwork - any artwork incorporating tangles which differs from the standard 3½ inch square tile). Chocolate Baroque also stocks other Zentangle Supplies (books, tiles & Sakura Pigma Micron pens etc....) plus a selection of Dreamweaver Stencils (some of which are featured in Zentangle 6).

tangles: Betweed, Knightsbridge, Opus, Tipple

I stamped the flower using grey ink as I wanted to have a framework for my tangles & yet be able to ignore the stamped lines if I wished to. I came to the conclusion that I had to either colour the flower or shade the tangles - I have much to learn in this department, besides which I'm also unfamiliar with watercolouring using the Distress Stains - & settled for colouring the flower. I actually watercoloured the flower first, dried it off with my heat gun & then worked on the tangles.

Recipe
Stamp Chocolate Baroque UA4SP0400 Tangled Garden. 
Inks VersaFine Smokey Gray; Broken China, Chipped Sapphire, Mustard Seed &Tumbled Glass Distress Stains.
Pens/Markers 01 Black Uni Pin Drawing Pen (tangles), Memento Tuxedo Black Dual Marker (edging tile).
Cardstock Winsor & Newton Cotman 190gsm Cold Pressed/NOT Grain Fin Watercolour Paper; Black
Punch Woodware (corner rounder).

I have lots of ideas for this challenge but my crafting time has been somewhat curtailed by a breakdown in my migraine control. As a consequence this blog & PEP & Paper have been rather lacking in posts, so my apologies if you have visited & found nothing new.

Friday 1 February 2013

A String of Circles

The 11th Challenge for the Chocolate Baroque Zentangle Group is to use a circular string. It is up to each individual to choose how to draw the circle or multiples thereof which may be the same or differing in size.

tangles: Auraknot, Crescent Moon, Fishnet, Jester, Nzepple, Printemps
I simply picked up my reel of double-sided tape & drew around the inside of it 3 times moving the reel without thinking before drawing the portion of the circle that fell within the area of my 'tile'. When I looked at the result I immediately thought 'Auraknot' so that was my first tangle. The remaining tangles were chosen by throwing my Icosahedron dice & using the tangles corresponding to each number on a list I compiled whilst working through the MCC Zentangle course last year.

Tuesday 1 January 2013

Tango Tangling

We have reached our 10th Challenge (now on a monthly basis)  for the Chocolate Baroque Zentangle Group. This month the challenge consists of only using two tangles for a tile.

I used TanglePatterns String 001 & varied both the size & infill pattern of the tangle Tripoli.

tangles: Purk, Tripoli

Wishing you all a Happy New Year